New Kitchen Part 8: Tiles
I didn't want a traditional tile backsplash all over the kitchen. There were a multitude of reasons including cost, labor, and upkeep. But the biggest reason was that I found a tile that I fell absolutely in love with and I wanted it to be a special focal point.
 I purchased my tile from The Tile Shop. I chose a beautiful green glass tile called New Haven and luckily, there was a subway tile sale going on at the time of purchase so I received 20% off. I had a bit of a mixed experience with The Tile Shop but in the end, I got what I wanted so I would say, yes, I recommend them.
The best thing about The Tile Shop is that each location offers a DIY class on Saturday mornings. So, even before our kitchen was completely demolished, my sister and I attended one of the classes just so we'd get a handle on how to tile. It's kind of funny because the tile was one of the first things we picked out but one of the last things we installed. Anyway, we were the only two attendees that morning so we actually got to get our hands dirty and try tiling ourselves.
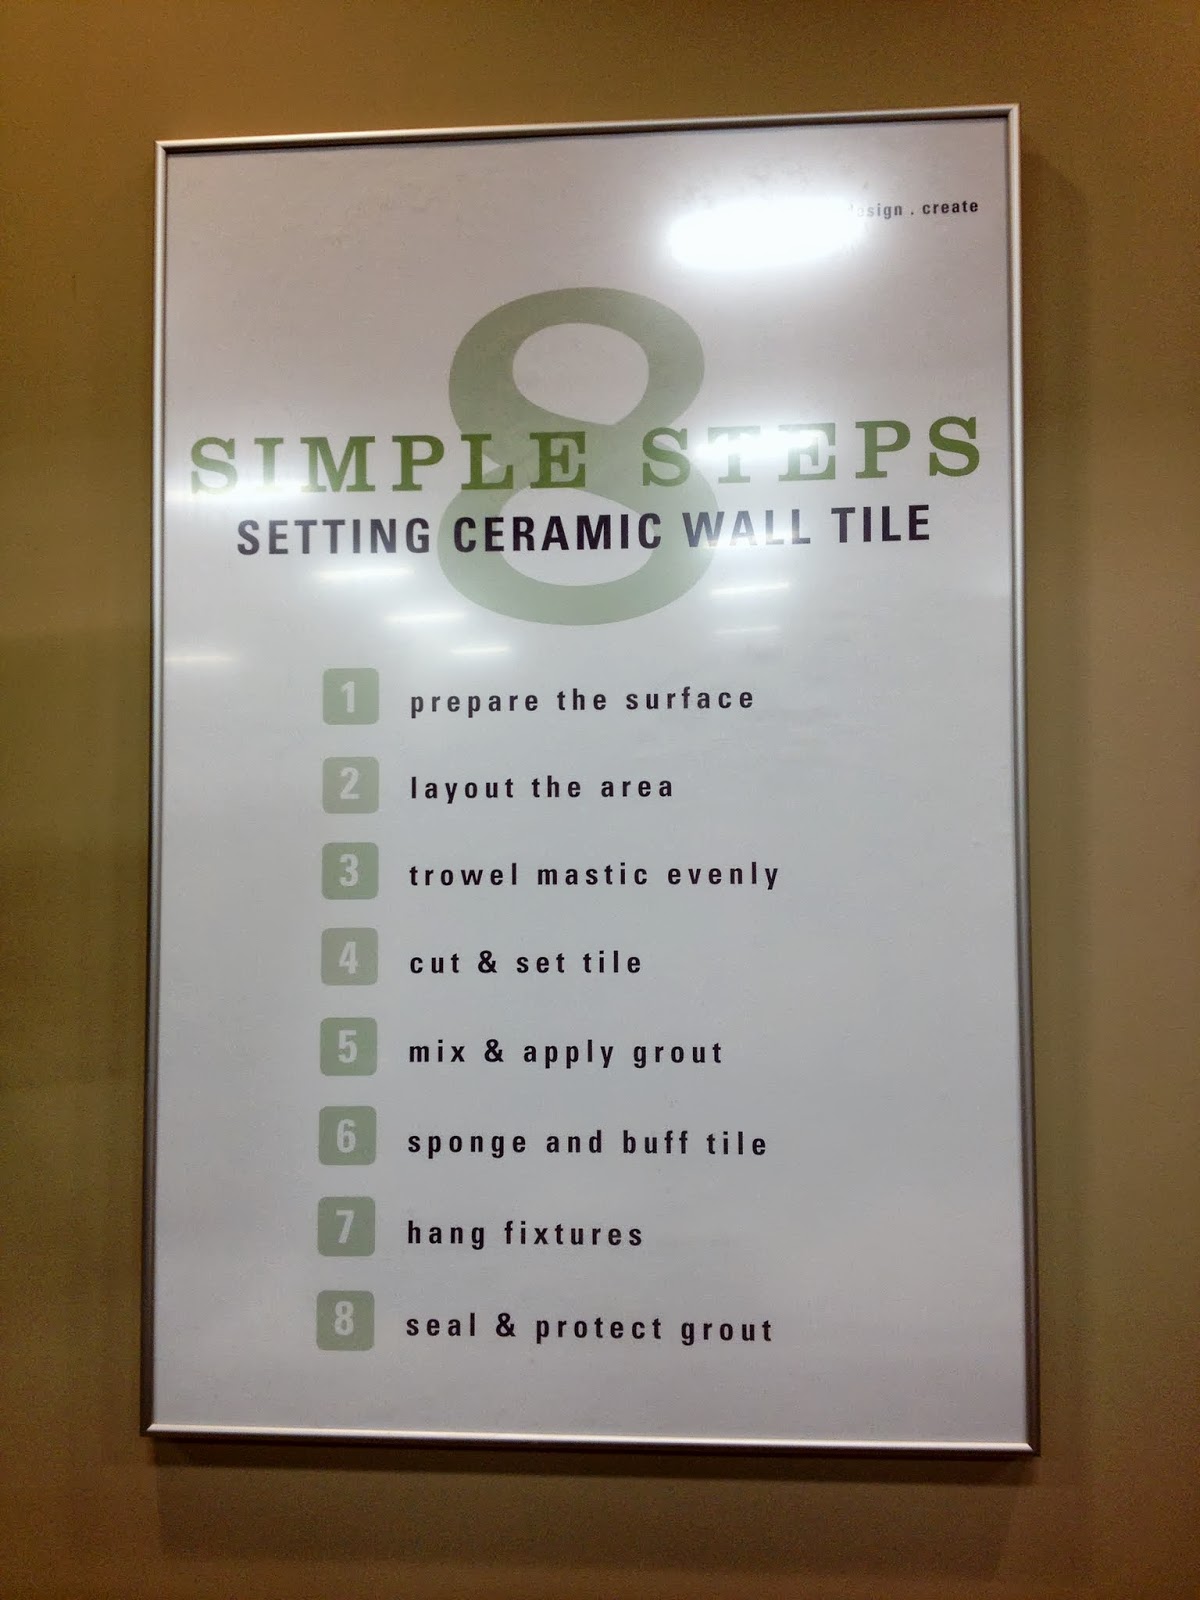
 I'm not sure how every class is conducted, but because the employee teaching the class had handled our purchase, he chose a subway tile for us to install because the tile we chose was also a subway tile style. Here are the 8 simple steps they outlined:
 We started by spreading some mastic on the backer board using a notched trowel held at an angle, and worked in small areas so that it wouldn't dry out faster than we could tile. We stuck in the tiles and the spacers and laid the them in a brick pattern.
 Here's my sister getting her hands dirty.
 Since we didn't have all day, we only waited a few minutes before getting right into the grouting. The grout was mixed to a toothpaste-like consistency and filled into the grooves using a rubber float. Then, the tile was wiped down with a damp sponge. This was the finished product:
 The process itself wasn't overly difficult but it was nice to get a little bit of practice before doing it ourselves. If you haven't tried something before, you can read about it and watch a zillion youtube videos with professionals demonstrating the process, but until you actually get your hands sticky, you won't really get it. Texture is a big factor. Plus, we learned a lot - like the fact that you need to get a good quality sponge that doesn't pill. When we were using an orange sponge to wipe down the grout and again to seal it, it left little orange pieces of lint everywhere. I think you can see one little orange squiggle embedded in the grout in the photo above.
Though I do admire the look of pristine white kitchens with carrera marble and white subway tile, I feel like it's too trendy. When I was looking up inspiration photos for ideas on how to style our kitchen, there was an incredible overload of white subway tiles and it just seemed like the "cool thing" to do. It is a classic look and I don't think it will ever look overly dated but I don't want my kitchen to just look like I copied every other kitchen. I don't plan on redoing the kitchen again for a long time (unless, perhaps, I fall into a crazy large sum of money). I wanted to go with something kind of cool but not overly faddy and that's how I settled on this tile:
 Isn't it beautiful? I was super inspired by this photo on Pinterest:
 I really loved the idea of incorporating a "pop of color." Even though I despise that term - I hate any phrase that's overused (e.g. "YOLO!" or "Location, I am in you." type douchebaggy loser sayings) - that's really what it is; it's a pop of color. And, I like the way the glass tile brings in a lot of light. I think glass tile also adds a bit of luxury and drama without being over the top.
The tile I chose is a blueish green or greenish blue (however you see it) which I think will nicely compliment the pinkish tone of our cabinetry and bring a bit of life to our kitchen. Plus, because our appliances are stainless steel, it will tie together all of the cool tones with the warm tones, if that makes any sense.
You might ask, "Why didn't you choose a mosaic glass tile?" Because I hate it. I'm sorry! If you have mosaic tile in your kitchen and you love it, then power to you. But personally, I despise mosaic tile. I think it just reminds me of grammar school restroom floors. The following anecdote might make me sound crazy but when I'd use the potty in grammar school, I'd be peeing and to pass the time (because sitting still as an 8-year-old is crazy boring, even if it's only for a few seconds) I'd stare at the mosaic tile floor and wonder to myself, "I wonder how they chose this pattern. Is it even a pattern? Is it just completely random?" and then I would try and figure out what the pattern was or look for the letter 'R' encrypted in the random pattern or try and find a blob of tiles that resembled an animal. Anyway, that's all I can think about when I see mosaic tile. Is that weird? Probably, and I'm sorry.
Same thing goes with the little horizontal stripe of different colored tiles that people seem to enjoy these days. That reminds me of the ladies' room at my office. And those tiles that have fruits embossed on them? Please, no, I cannot.
I tried using normal tile cutters but either our tile was too thick or my technique was flawed. Either way, I think I would've been able to do a bit better on a thinner tile and with a bit more practice, but our tiles are quite thick and we don't have a million tiles to spare so instead, we opted to use a wet tile saw.
 I'm so excited to show you the following photos because it's about to get really pretty all up in here.
First, we decided how we wanted to lay out the tile and cut a bunch of pieces for the ends.
 Then, we mixed up the thinset, using a two part mixture, to a toothpaste-like consistency. The thinset we used was specifically for glass tile.
 Then, up went the tiles. It was actually really annoying to put these up on a vertical surface. I imagine that doing a floor is much easier because gravity helps you. The spacers (between two adjacent tiles in each row) kept falling out.
 Tada! We let this set up for a day.
 Exactly 24 hours later, I mixed up the grout (again to a toothpaste-like consistency) and filled up a piping bag (just a normal icing bag). You can use a zip-top bag and just cut the tip off. Piping the grout made the process so much easier and cleaner.
 I just piped the grout in between the tiles and then my sister followed behind me with the float.
 Then, she wiped everything down with a damp sponge.
 So pretty, right? In this shot, we still haven't wiped off the grout haze or caulked but it still looks pretty good, right? I'll be sharing the completed product in my finished kitchen post so please stay tuned.
 Thanks for reading. My next 'new kitchen' post will be about the "finishing touches" and then after that will be the finished kitchen shots.
Cheers.

The best thing about The Tile Shop is that each location offers a DIY class on Saturday mornings. So, even before our kitchen was completely demolished, my sister and I attended one of the classes just so we'd get a handle on how to tile. It's kind of funny because the tile was one of the first things we picked out but one of the last things we installed. Anyway, we were the only two attendees that morning so we actually got to get our hands dirty and try tiling ourselves.


Though I do admire the look of pristine white kitchens with carrera marble and white subway tile, I feel like it's too trendy. When I was looking up inspiration photos for ideas on how to style our kitchen, there was an incredible overload of white subway tiles and it just seemed like the "cool thing" to do. It is a classic look and I don't think it will ever look overly dated but I don't want my kitchen to just look like I copied every other kitchen. I don't plan on redoing the kitchen again for a long time (unless, perhaps, I fall into a crazy large sum of money). I wanted to go with something kind of cool but not overly faddy and that's how I settled on this tile:

The tile I chose is a blueish green or greenish blue (however you see it) which I think will nicely compliment the pinkish tone of our cabinetry and bring a bit of life to our kitchen. Plus, because our appliances are stainless steel, it will tie together all of the cool tones with the warm tones, if that makes any sense.
You might ask, "Why didn't you choose a mosaic glass tile?" Because I hate it. I'm sorry! If you have mosaic tile in your kitchen and you love it, then power to you. But personally, I despise mosaic tile. I think it just reminds me of grammar school restroom floors. The following anecdote might make me sound crazy but when I'd use the potty in grammar school, I'd be peeing and to pass the time (because sitting still as an 8-year-old is crazy boring, even if it's only for a few seconds) I'd stare at the mosaic tile floor and wonder to myself, "I wonder how they chose this pattern. Is it even a pattern? Is it just completely random?" and then I would try and figure out what the pattern was or look for the letter 'R' encrypted in the random pattern or try and find a blob of tiles that resembled an animal. Anyway, that's all I can think about when I see mosaic tile. Is that weird? Probably, and I'm sorry.
Same thing goes with the little horizontal stripe of different colored tiles that people seem to enjoy these days. That reminds me of the ladies' room at my office. And those tiles that have fruits embossed on them? Please, no, I cannot.
I tried using normal tile cutters but either our tile was too thick or my technique was flawed. Either way, I think I would've been able to do a bit better on a thinner tile and with a bit more practice, but our tiles are quite thick and we don't have a million tiles to spare so instead, we opted to use a wet tile saw.

First, we decided how we wanted to lay out the tile and cut a bunch of pieces for the ends.


Cheers.
To get more relevant information visit here Kitchen remodeling Austin
ReplyDeleteWe’ve been stumbling around the internet and found your blog along the way.
ReplyDeleteWe love your work! What a great corner of the internet :)
www.pavetile.com.au
Wow — what an inspiring kitchen makeover journey! The green glass kitchen tiles from The Tile Shop look absolutely stunning — such a refreshing alternative to the usual white subway tile trend. The color, light reflection, and subtle drama really make your space feel vibrant and unique. Can’t wait to see the final reveal!
ReplyDelete