New Kitchen Part 10: Tada!
I didn't really know how many parts this "series" would have, but it somehow worked out that Part 10 is the big reveal post. How perfect. This kitchen renovation has taken almost three months from brainstorming to completion and it was worth every minute. FYI, we had a few delays with the delivery and we were limited in scheduling the countertop templating and installing so maybe we would have been finished if everything had been timed a bit more smartly but it is what it is. I did the math and it took exactly 70 days from finalizing the design to caulking. We still have a few (relatively minor) loose ends to tie up but I'm really pleased with what it looks like right now so I'm sharing anyway. I'm impatient and I just can't wait.
 If you are unfamiliar with the journey it took to get to this point, you can take a look through my previous New Kitchen posts. If not, just jump ahead to see what our finished kitchen looks like (though, the title photo kind of spoils the big reveal, right?). Ah! I'm so excited! I must warn you, this is a photo-rich and text-rich post but if you're uninterested in what I have to say, you can just scroll through the photos and just ignore the words. It's a free country!
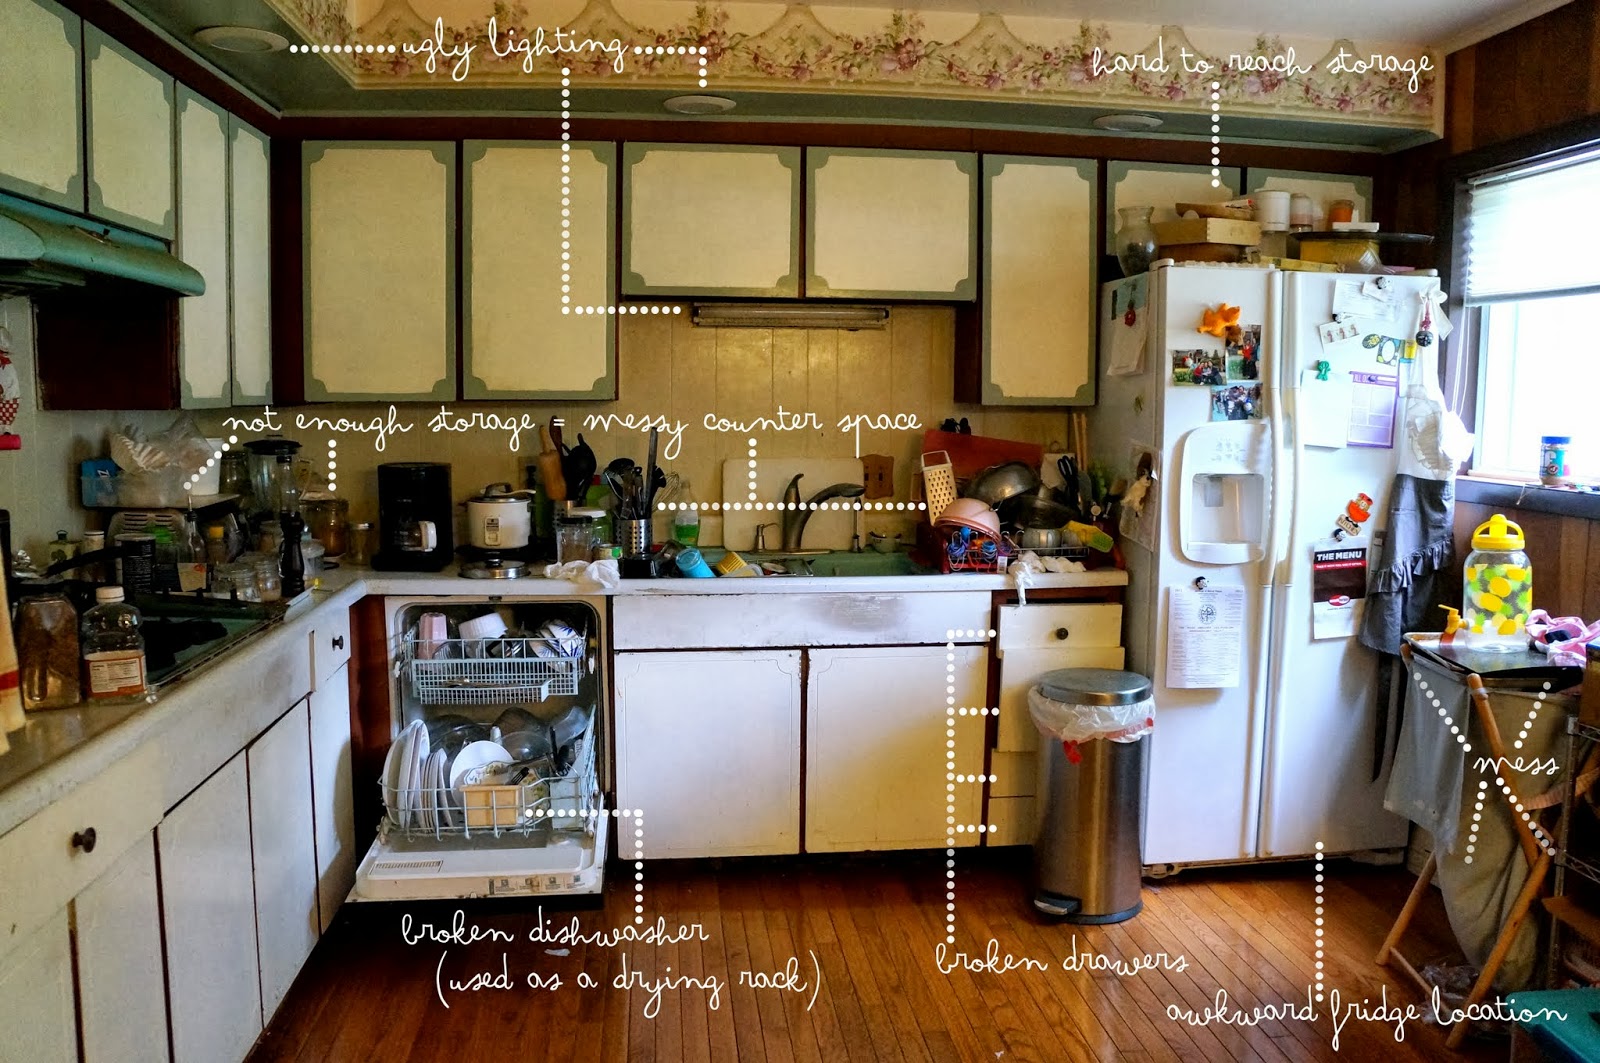
Right, before I share any of the juicy shots, let me just remind you again what we started with: a lack of functional storage, old appliances, not enough counter space, unflattering lighting, broken cabinets and drawers, and overall, everything was dated and crusty and really underwhelming.

 Disgusting clutter. Clutter, clutter, everywhere. I don't know what it is about my family but we make messes so quickly. Here's our old dining set and buffet.

And lots of hard work later (though we still have a few more things to do... like you'll see that we're missing a little bit of molding on the top of our corner cabinet in the photo below) here's what it looks like:
 We installed lights above the sink to highlight the pretty backsplash. I am still so in love with this tile. We used a good sealer on the grout so that any water that splashes onto the tile and grout just beads up and rolls right off like magic. The sink is great because it's humongous and since it's a double sink, we can multitask with it. I can be soaking dishes in one tub while rinsing vegetables in the other. I also love our dishwasher because you don't even know it's there! It just blends in; it's camouflaged quite nicely. Everyone who has come over to see our kitchen has asked, "Do you have a dishwasher?" and they are so impressed when we show them.

 The framed "poster" above the stove is probably my favorite decorative item in the new kitchen! It's a diagram of a cow with all of the various cuts of meat from the various parts of the cow. It's actually the backside of a menu from a steakhouse called BLT (from the San Juan, PR location). I didn't think we needed a backsplash behind the range because it has quite a tall back piece but I wanted to add something behind it anyway. Then, I found this menu (that I had saved from my trip last November) while I was cleaning my room and had the idea to frame it and stick it here. Do you love it? I love it.
 Here's our little island area. We always keep a few candles (vanilla scented and honey scented), a little glass bottle vase full of fresh mint (from our garden) and a glass cake stand (which we got from Target on sale for $20) on top of the island. It doesn't take up much space but it adds a little homeyness and lived-in-ness. Plus, it's all functional stuff: we light the candles after a particularly smelly cooking session, we use the mint to garnish our desserts, and the cake stand gets filled with baked goods quite often. I'll be sharing a recipe for those apple galettes you see sitting on the cutting board in a week or two. Oh, and that wooding cutting board (along with a marble slab) are pretty much permanent fixtures on the island.


 In the photo below, you can see our pull-out trash. Ikea doesn't offer a cabinet specifically designed to be a trash pull-out so we just finagled it to suit our needs. It's a 15" cabinet with a trash can from Home Depot that fits just perfectly in the space. We installed one drawer on top to hold trash bags, which is so convenient and efficient. Ikea automatically gives you three drawers with pull out base cabinets but obviously, that wouldn't leave much room for the bin. The middle drawer ended up being installed elsewhere. You'll see how it was used after you scroll down a bit more.
 And here's our humongous pantry. I understand it might not seem that huge to some people, but considering we didn't have a pantry at all previously, it feels quite large to us. We installed lights in here just for kicks (they're relatively unnecessary) and these are controlled by the same switch as the lights above the sink. We used full-sized shelves to create a thin space, which is the perfect size for storing cookie sheets, and a slightly thicker space for storing baking pans. I love the baking pan nooks because they are accessible but also discreet and out of the way. In the space above, we used half-sized shelves. It reduces the amount of surface area for storage, sure, but the cabinet is so huge and it's holding so much stuff already, I doubt we will miss it. The drawer below the shelves holds things like potatoes, onions, garlic and then the bottom drawer has stuff like the bulky giant bags of flour and sugar (which we dump into the air-tight jars in the pantry for better access and ease of use), huge packages of Korean sweet potato noodles, and other less frequently used items.
 Here is a little mini gallery wall; it's a nice way to decorate the empty wall space between our windows. I used food-related photos - like from our apple picking trip, an ice cream cone from Belize, a monkey with a banana (also from Belize). I ordered a few other photos so that we could switch things up when the mood strikes us. I always print my photos through Snapfish. They're so quick and there are always coupons and special deals which makes the prints are really affordable.
 Here are the cabinets around our fridge. On one side, we store mostly GM's stuff, napkins, paper towels, and other miscellaneous stuff and on the other (the side closer to the range), we have pots and pans. Two aprons are hanging off of the door handle in the photo below but since these photos were taken, I stuck a 3M hook inside that cabinet door and now they're tucked away and out of sight.
 We also made a little junk drawer in the left side cabinet. This is where we used the extra drawer from the trash pullout cabinet. This is where we keep things like scissors, tape, extra 3M hooks, string, Aleve (my favorite painkiller - yes, I have a favorite painkiller), tack nails, and other random stuff.

These are the drawers in our island. We keep smaller cooking/baking tools (rolling pin, biscuit cutters, citrus reamer, cookie scoop, measuring cups, rubber spatula, offset spatula, bench scraper, rasp, etc.) in the one top drawer and random tools (garlic press, turkey baster, pizza cutter) and steak knives in the other. Dishes, bowls, and tupperware are in the drawers below. There weren't any bowls in there when this photo was taken because they were all in the dishwasher.
 I installed (yes, I personally did this particular task) a little rack for hanging dish cloths on the side of the island (behind the sink). The floral and pink dish cloths are from Ikea and they're pretty, but not super absorbent. I feel like they're more of a decorative item than a functional one. We also had a few magnetic hooks on our old fridge so I grabbed one and stuck it to the oven so we could keep our oven mitts in a convenient location.
 And here's our dining set. You can see that the table is really small but that is my favorite thing about it because we can't leave any clutter on the table. There just isn't any space for it. Hoorah! Those chairs are the Henriksdal chairs from Ikea (currently $20 cheaper with an Ikea Family card). They are super plush and comfortable. You might have noticed that the radiator covers are missing. That's another thing we haven't finished because we haven't been able to track down the right size for our house. It still works so right now it's just an eyesore.
 And here's the light we installed in our foyer. It's so pretty! I love it. I actually want to move it a little so that it's centered in the frame. Maybe I'll get to it tomorrow.
 Here's just a closeup of the light. It's kind of industrial, which I like. I feel like it makes our kitchen/dining/foyer area a little less sweet, in a good way.
 Here's GM's area. He has two bowls, a little ceramic dog head ($3 on clearance at Home Goods), and dog butt hooks for his leash, sack full of poop scoop plastic bags, and reflective vest for nighttime walks. Cute right? I feel a little bad because he's stuck next to the recycle bin but I don't think he minds. Also, we need to paint the trim, but I've just been too lazy to break out the paint buckets.
 So that's pretty much everything. But I just have to share a few photos I took of GM looking like he's making use of the kitchen because it's cute. I am so useless.

 GM is a pretty good chef. Just kidding. He's not cooking anything. He never cooks. He's lazy.

 Here's one last view.
 And here's a short video where I take you on a brief tour of the kitchen. I don't show everything because I didn't want it to be longer than 2 minutes and it's not the greatest video in the world but it's still relatively informative. And you can see the slow close drawers and doors. And it's in HD!
You maybe wondering, "Hey, where's your microwave?" We don't use the microwave too often and honestly, I'm not a big fan of radiating my food. I'd rather take a little extra time to reheat something in the oven or on top of the stove. I'm not one of those people that wants to preach about how bad microwaves are because I think they're safe to use; I just don't prefer them. I read an article about a girl in school who performed a science experiment with the effects of microwaved water on plants and it just fueled my non-fandom mini-fire. But honestly, there are always opposing studies - one day chocolate is good for you, the next day it's killing you so if you love your microwave, then that's great.
And, if you were wondering, I am enjoying all of our new appliances. The dishwasher, range, fridge, and hood are all great.
Final Budget & Shopping Guide
For your convenience, I'm listing where we got our stuff and how much we paid for it.
Cabinetry: Ikea $2,995 (it's a little less than I stated previously because we returned the cover panels and some shelves)
Appliances: Ikea, Sears, Home Depot $2,850 (Ikea for dishwasher and hood, Sears for fridge and range, Home Depot for water softener)
Quartz Countertops: Atlas Marble & Granite via Ikea $2,070
Paint: Behr via Home Depot $187 (multi-surface primer, paints in 'Only Natural' and 'China Cup')
Floor refinishing: Royal Wood Floors $600
Tile, install supplies & tools: The Tile Shop $300 (New Haven)
Miscellaenous lumber, trim, and molding: Morristown Lumber and Home Depot $300 (approximation)
Lighting: track light from Ikea $50, pendant light from Ikea $30, chandelier is old
Switchplates: Home Depot $20
Cabinet hardware: Home Depot $135 (knobs, pulls)
Total: $9,537 Whoo! Under budget! *FYI, the prices above are before sales taxes. I thought it would be easier to share the amounts without the sales tax because it varies in every state so that if you live not in NJ (where the sales tax is 7%), you can make an estimate using your state's sales tax rate. Obviously, with sales tax, I am above $10,000, but only by about $60. I mentioned this before but for whatever reason, we were not charged sales tax on our countertops so we saved about $150 in sales tax there.
We did spend a little bit of money on a new dining set and bar stools ($345 $265 - with Ikea Family discount - for Henriksdal chairs and Ingo table and $160 for Henriksdal bar stools) which puts us slightly over budget so we're still below budget even with the dining set and bar stools! Those Henriksdal chairs are totally worth it because they are so comfortable. It's like sitting on fluffy little clouds.
So, what do you think of our new kitchen? I love it. And thankfully, we are finished in time for the best food-based holiday of the year, Thanksgiving. I definitely know what I'm thankful for this year.
If you followed me along on this haphazard and stressful journey, I want to say thanks! It's been quite an ordeal and really painful at times but it was all worth it. I'll have a few follow up posts on lessons learned and what we ate and a few other tips so stay tuned for those.
Cheers.

Right, before I share any of the juicy shots, let me just remind you again what we started with: a lack of functional storage, old appliances, not enough counter space, unflattering lighting, broken cabinets and drawers, and overall, everything was dated and crusty and really underwhelming.


On the side of our island, we have this cute little greenhouse. If you're interested in the greenhouse and painted planters, head over to my travels blog. I share a lot more about it over there.

We are keeping our greenhouse on top of this sort of industrial looking shelf. Previously, this shelf sat underneath our window near the fridge and it was just a magnet for clutter because its function was to hold miscellaneous things. But now, it serves the distinct purpose of housing our appliances (blender, baby crockpot, mini food processor, medium-sized food processor, hand-held mixer, waffle iron, and ice cream maker). The bottom shelf is also a makeshift bar of sorts. I'm not a huge drinker, though I enjoy a cocktail or glass of Moscato from time to time, so there are just a few random bottles of wine, a shaker, and one or two bottles of the harder stuff.


These are the drawers in our island. We keep smaller cooking/baking tools (rolling pin, biscuit cutters, citrus reamer, cookie scoop, measuring cups, rubber spatula, offset spatula, bench scraper, rasp, etc.) in the one top drawer and random tools (garlic press, turkey baster, pizza cutter) and steak knives in the other. Dishes, bowls, and tupperware are in the drawers below. There weren't any bowls in there when this photo was taken because they were all in the dishwasher.


You maybe wondering, "Hey, where's your microwave?" We don't use the microwave too often and honestly, I'm not a big fan of radiating my food. I'd rather take a little extra time to reheat something in the oven or on top of the stove. I'm not one of those people that wants to preach about how bad microwaves are because I think they're safe to use; I just don't prefer them. I read an article about a girl in school who performed a science experiment with the effects of microwaved water on plants and it just fueled my non-fandom mini-fire. But honestly, there are always opposing studies - one day chocolate is good for you, the next day it's killing you so if you love your microwave, then that's great.
And, if you were wondering, I am enjoying all of our new appliances. The dishwasher, range, fridge, and hood are all great.
Final Budget & Shopping Guide
For your convenience, I'm listing where we got our stuff and how much we paid for it.
Cabinetry: Ikea $2,995 (it's a little less than I stated previously because we returned the cover panels and some shelves)
Appliances: Ikea, Sears, Home Depot $2,850 (Ikea for dishwasher and hood, Sears for fridge and range, Home Depot for water softener)
Quartz Countertops: Atlas Marble & Granite via Ikea $2,070
Paint: Behr via Home Depot $187 (multi-surface primer, paints in 'Only Natural' and 'China Cup')
Floor refinishing: Royal Wood Floors $600
Tile, install supplies & tools: The Tile Shop $300 (New Haven)
Miscellaenous lumber, trim, and molding: Morristown Lumber and Home Depot $300 (approximation)
Lighting: track light from Ikea $50, pendant light from Ikea $30, chandelier is old
Switchplates: Home Depot $20
Cabinet hardware: Home Depot $135 (knobs, pulls)
Total: $9,537 Whoo! Under budget! *FYI, the prices above are before sales taxes. I thought it would be easier to share the amounts without the sales tax because it varies in every state so that if you live not in NJ (where the sales tax is 7%), you can make an estimate using your state's sales tax rate. Obviously, with sales tax, I am above $10,000, but only by about $60. I mentioned this before but for whatever reason, we were not charged sales tax on our countertops so we saved about $150 in sales tax there.
We did spend a little bit of money on a new dining set and bar stools (
So, what do you think of our new kitchen? I love it. And thankfully, we are finished in time for the best food-based holiday of the year, Thanksgiving. I definitely know what I'm thankful for this year.
If you followed me along on this haphazard and stressful journey, I want to say thanks! It's been quite an ordeal and really painful at times but it was all worth it. I'll have a few follow up posts on lessons learned and what we ate and a few other tips so stay tuned for those.
Cheers.
your kitchen looks great! just wanted to say that i love your korean recipes. i just graduated college and am living on my own, so i'll definitely be using your blog to look up recipes for korean food when im missing home food!
ReplyDeletealso totally random, but i just looked at your about me section and noticed you majored in civ e! i just graduated from northwestern in engineering too :) i majored in mechanical but actually started in civil!
DeleteThank you thank you thank you! Whoo engineering! :)
DeleteKorean food is the best, right? Thanks for reading!
Rachel, this is awesome! Enjoy it!
ReplyDeleteThanks, super John! :):):)
DeleteLove- do you mind sharing the name of your tile? It is just what i am looking for!
ReplyDeleteHi there and thanks for reading!!
DeleteOur tile was called "New Haven" from the Tile Shop. I linked it above, but it looks like they no longer carry it, which sucks. However, I'm sure if you did a quick search for 'green glass subway tile' you could find a similar match.
Here's one that looks pretty close: http://www.subwaytileoutlet.com/products/Sage-Green-Glass-Subway-Tile.html?gclid=COCKsPrg2b8CFVIQ7AodtyEASg#.U87JKvldX9U
Gorgeous and pretty photos, fantastic photos!
ReplyDelete